
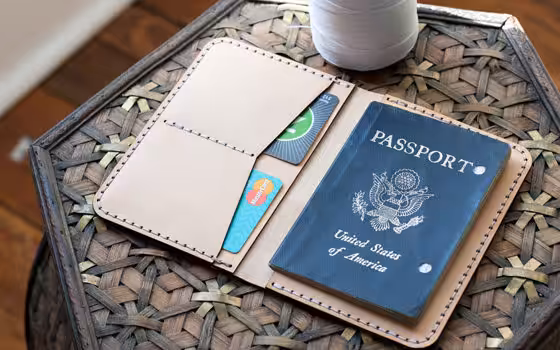
Picked up one of our templates—or thinking about it—but not sure where to start? No worries! This page has everything you need to start leather craftin’ in no time.
Let’s start by talking about the different template format option you have to choose from: Print Ready PDFs, Laser Ready Files, and, Acrylic Templates.
Print Ready PDFs
Our Print Ready PDF leather template files are designed to be printed our on either US Letter size paper (8.5″ x 11″) or A4 size paper (210mm x 297mm). Please choose whichever matches the printer format you will be using.
1. Check Your Leather Weight
Each design is tested with specific leather weights, which are listed on the template. If your leather is a bit thinner or thicker, you’ll probably be fine. But if it’s way off — like super thick or super thin — the final result might not turn out the way you expect.
2. Use the Scale Test (Seriously, Don’t Skip This)
At the bottom of your PDF (usually the first or last page), you’ll see a little scale test box. It says:
“Please measure either square to verify the page printed to correct scale.”
You’ll see both a 1-inch square and a 25mm square — depending on whether you use imperial or metric, either works. Grab a ruler and make sure one of those squares measures exactly as labeled. Top to bottom, left to right — doesn’t matter. If it’s off, your printer settings are probably scaling the file.
Fix it by:
- Going back to your print settings
- Setting the scale to 100%
- Choosing “actual size”
- Then reprint
If your scale is off, the pieces won’t line up the way they should — and nobody wants a wonky wallet.
3. Choose How You’ll Use the Template
You’ve got a few options depending on whether you want to use the template just once or make it reusable.
Option A: Reusable Templates
If you want something that lasts:
- Print on card stock. Regular printer paper is flimsy and terrible for tracing. Try 110 lb card stock or whatever the thickest your printer can handle.
- Or glue it to cardboard. Print on regular paper and glue it to something sturdier like an old cereal box. Then cut it out and boom — instant reusable pattern.
Option B: One-and-Done Templates
If you’re cool with a single-use option:
Sticker paper method: Print the template on full-sheet sticker paper, peel the back off, and stick it directly to the leather. It’s a clean way to transfer the pattern — but again, test it first. Some sticker adhesives are super strong and could mess up your leather’s surface.
Tape method: Tape the printed paper directly onto your leather, then cut along the lines. Use clear or semi-transparent tape so you can still see details like stitching holes. Just a heads up: some tape can be too grippy and might damage the leather, so test it first.
Laser Ready Files
Got a laser cutter and want to go straight from digital file to finished cut? Or maybe you want to make your own acrylic templates? The laser-ready file option is exactly what you’re looking for.
What’s Included
Each laser-ready download includes three file types:
- SVG
- EPS
- AI (Adobe Illustrator)
That means whether you’re using:
- LightBurn
- Inkscape
- Adobe Illustrator
- xTool Creative Space
- Or any other vector editing software…
You’ll have a format that works for your setup.
Before You Cut: Run a Quick Scale Test
Once you import the file, don’t skip the scale check. It’s quick and makes sure your cuts come out the right size.
Here’s what to do:
- Open the file in your software of choice.
- You’ll see two squares — one labeled 1 inch, one labeled 25mm.
- Use your software’s measurement tools to check that the square measures exactly what it says.
If the size is off, that means the scale didn’t import correctly. Fix that before you start cutting to make sure your leather pieces line up just right.
After the Check
If the scale looks good, you’re ready to go! Please delete the scale test section from the file and set up your cut settings however you need.
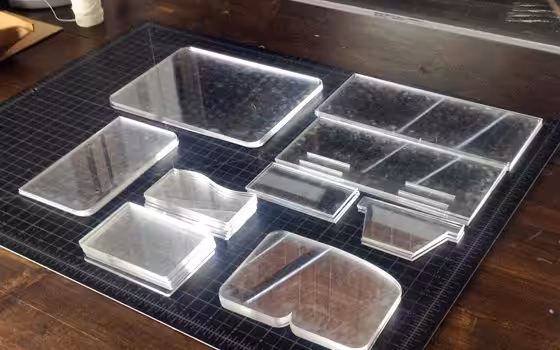
Acrylic Templates
If you choose the Acrylic Templates option, I’ll be cutting the physical templates for you and shipping them right to your door — no extra steps needed on your end.
What They Look Like
When they arrive, they’ll look something like this:
- Clear acrylic on the front
- Craft paper backing on the back (to protect the surface during shipping)
You can use them as-is, but most people prefer to peel off the paper backing. Once removed, you’ll have a transparent, durable template that makes tracing super easy.
How to Use Them
Just place the acrylic template on your leather, grab a scratch awl and:
- Trace around the outside
- Mark your stitching holes
- Use the firm edge to get clean, accurate lines to follow with a blade
They’re sturdy, reusable, and make the whole process a lot smoother — especially if you’re planning to make the same design more than once.
Stitching Holes and Thread: What You Need to Know
Let’s talk stitching holes and thread — because while we’ve got defaults built into our templates, there’s plenty of flexibility depending on your tools and preferences.
Do You Have to Use the Stitching Holes?
Nope! You can totally use your own stitching chisels and spacing. Our templates will still work great. But if you do plan to use the holes we’ve included, here’s how to get the best results.
Default Hole Spacing: 6mm Center-to-Center
All MAKESUPPLY templates that require stitching use a 6mm pitch — meaning the holes are spaced 6 millimeters apart from center to center. This is consistent across:
- Printed paper templates
- Acrylic templates
- Laser-ready files
So, no matter which version you’re using, that spacing stays the same.
How to Punch the Holes
If you’re punching your holes by hand, you’ve got two options:
1. Single Hole Punch (No Chisel Set Needed)
This is the simplest route and great if you’re just getting started.
- Get a 1mm -1.25mm round leather hole punch
- Apply your paper or acrylic template to the leather
- Use a rubber mallet or leather maul to punch each hole individually
It’s time-consuming, but gets the job done.
2. Stitching Chisel Set (Recommended)
If you’re planning to do a lot of projects, invest in a chisel set. It speeds up the process a lot by punching multiple holes at once.
The key is to make sure the chisels are:
- 6mm pitch (center-to-center)
- Any shape works: round, diamond, or slanted
Budget Option:
- Basic chisel sets with 2-tooth and 4-tooth punches
- Often round holes, but plenty good for everyday work
Premium Option:
- Sinabroks chisels — top of the line
- Precision round holes, excellent quality
- Come in 1.25mm and 1.5mm hole sizes — both work great with our templates
Thread Recommendations
We use and recommend 0.8mm thick flat braided polyester thread — commonly known as Tiger Thread or Ritza Thread.
Why we love it:
- It sits perfectly in a 1mm–1.5mm hole
- It’s strong, consistent, and looks clean
You can get it in:
- Small spools for casual use
- Larger rolls if you’re doing a lot of stitching
It comes in tons of colors, so you can match your vibe.
Our go-to needles:
John James Saddler’s Needles – Size 00. I think I mis-spoke in the video on the size. My bad!
These are:
- Thick enough to grip well while hand-stitching
- A perfect match for 0.8mm thread
- Durable and easy to work with. Much less “stabby” than the smaller needles.
You can size down a bit if needed, but this combo is solid.
TL;DR
- Default hole spacing = 6mm
- Use your own spacing if you want — no problem
- Punch by hand with a 1/1,25mm punch, or upgrade to a 6mm pitch chisel set
- Thread sweet spot = 0.8mm flat-braided polyester
- Pair it with Size 00 Saddler’s needles
And that’s it! If you follow these general guidelines, your stitching will look clean, consistent, and professional.


1 comment
Comments are closed.